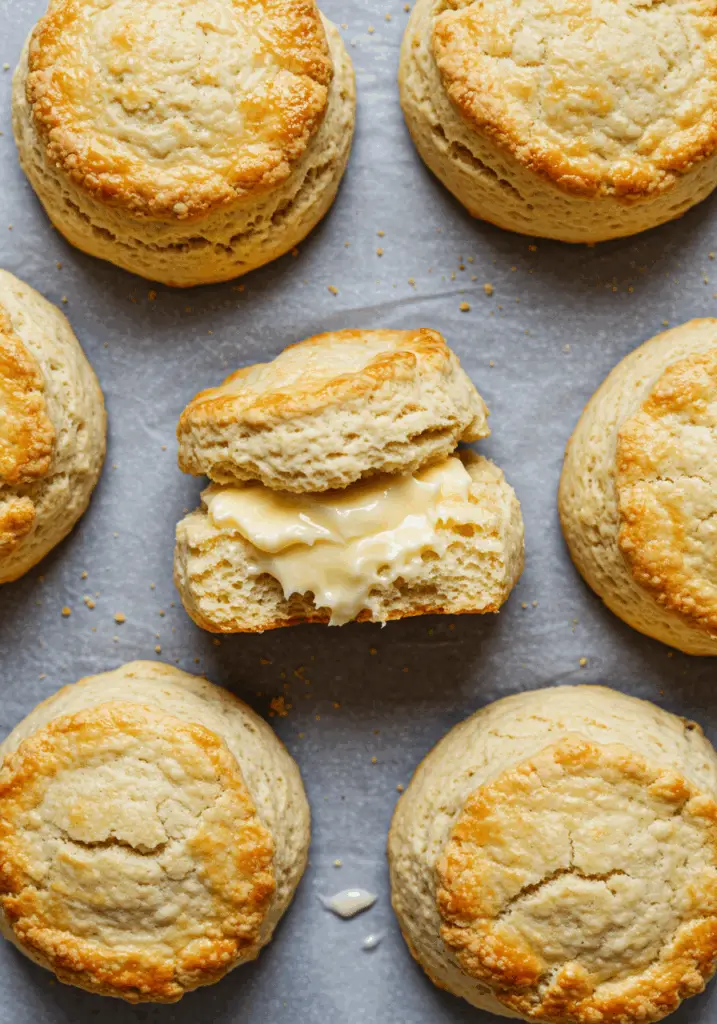
Fluffy, golden, and slightly tangy, these Buttermilk Scones are the ultimate baked treat for breakfast, brunch, or afternoon tea. Made with simple pantry ingredients and rich buttermilk, they’re tender on the inside with a beautifully crisp top. Serve them warm with butter, jam, or clotted cream for a comforting classic you’ll want to make again and again.
Want recipes like this delivered straight to your inbox? Subscribe now to get the latest culinary creations you’ll love.
Why You’ll Love This Recipe
Light & Tender – The buttermilk keeps these scones ultra-moist and soft inside.
Quick to Make – Ready in under 30 minutes from start to finish.
Perfectly Versatile – Enjoy them sweet or savory with endless topping options.
Ideal for Any Occasion – Great for brunch spreads, tea parties, or cozy weekend mornings.
Easy to Customize – Add fruits, spices, or even cheese for a twist.
Ingredients You’ll Need
Dry Ingredients:
2 cups all-purpose flour
1 tbsp baking powder
¼ tsp baking soda
½ tsp salt
3 tbsp granulated sugar
Wet Ingredients:
½ cup unsalted butter (cold and cubed)
¾ cup buttermilk (cold, shaken well)
1 tsp vanilla extract (optional, for added depth)
Optional Add-ins:
½ cup dried fruit (like cranberries, currants, or raisins)
Zest of 1 lemon or orange (for a citrusy note)
Topping:
1 tbsp milk or extra buttermilk (for brushing)
1 tbsp coarse sugar (for sprinkling, optional)
Tools You’ll Need
Mixing bowl
Pastry cutter or fork
Baking sheet
Parchment paper
Measuring cups and spoons
Cooling rack
Pastry brush
Step-by-Step Instructions
Step 1: Preheat & Prep
Preheat your oven to 425°F (220°C).
Line a baking sheet with parchment paper and set aside.
Step 2: Mix Dry Ingredients
In a large mixing bowl, whisk together flour, baking powder, baking soda, salt, and sugar.
This ensures even distribution of leavening agents and flavor.
Step 3: Cut in the Butter
Add cold cubed butter to the flour mixture.
Use a pastry cutter or fork to blend until the mixture resembles coarse crumbs with pea-sized butter pieces.
Cold butter is key to flaky layers.
Step 4: Add Buttermilk
Pour in the buttermilk and vanilla extract (if using).
Gently stir with a wooden spoon or spatula until a rough dough forms.
Do not overmix — the dough should be shaggy.
Step 5: Fold in Add-ins (Optional)
If using dried fruit or zest, fold it into the dough now.
Step 6: Shape the Dough
Turn the dough onto a lightly floured surface.
Gently knead 2-3 times until it comes together.
Pat it into a 1-inch thick round.
Cut into 8 wedges or use a biscuit cutter for rounds.
Place scones on the prepared baking sheet.
Step 7: Brush & Sprinkle
Brush the tops with milk or buttermilk.
Sprinkle with coarse sugar for a golden, slightly crunchy top.
Step 8: Bake the Scones
Bake for 12–15 minutes, or until golden brown and puffed.
Edges should be crisp, and the inside should be tender.
Step 9: Cool Slightly & Serve
Let scones cool on a wire rack for 5 minutes.
Serve warm with butter, jam, or your favorite spread.
Tips for Perfect Buttermilk Scones
Use Cold Butter – It creates steam pockets that make scones flaky.
Don’t Overmix – A gentle touch keeps them tender.
Chill Before Baking – If your dough gets too warm, chill it for 10 minutes.
Customize Freely – Add cheese, herbs, chocolate chips, or fruit for endless flavor combos.
Store Right – Keep leftovers in an airtight container for up to 2 days.
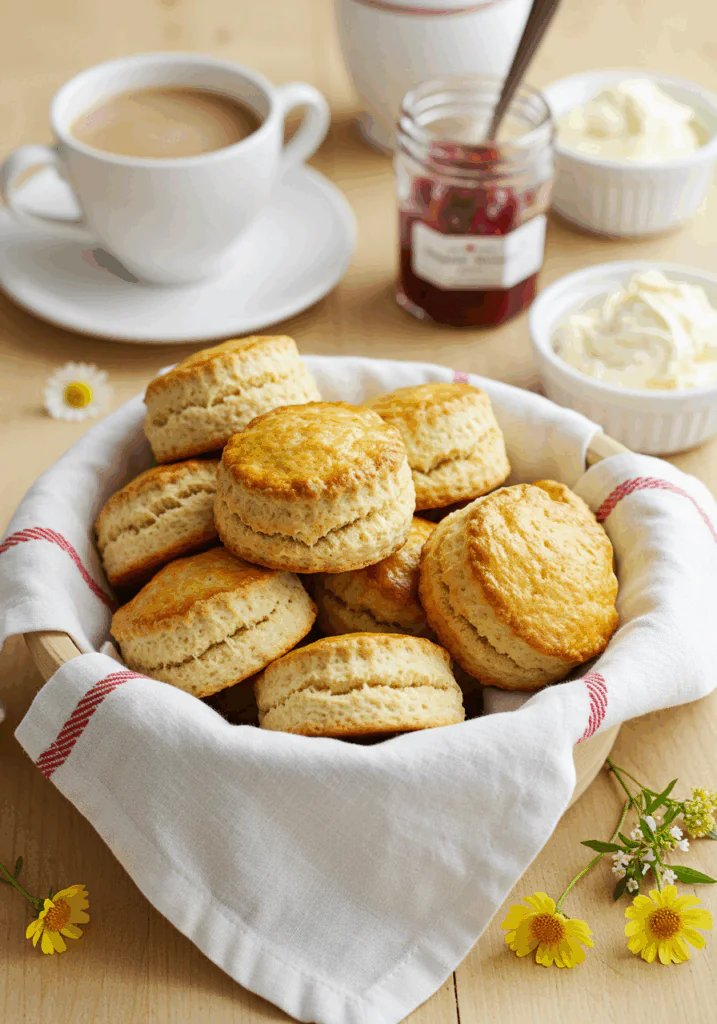
Serving Suggestions
Classic with Jam & Cream – Perfect with strawberry or raspberry preserves.
Savory Twist – Add shredded cheddar and chopped chives for a breakfast scone.
Honey Butter – A sweet and creamy spread that melts beautifully on warm scones.
Fruit Compote – Serve with warm blueberry or apple compote for a comforting treat.
Iced Tea or Coffee – The perfect pairing for a relaxing afternoon break.
How to Store & Reheat
Storing:
Room Temperature: Store in an airtight container for up to 2 days.
Refrigerate: For longer freshness, refrigerate for up to 4 days.
Freeze: Freeze individually wrapped scones for up to 2 months.
Reheating:
Oven: Reheat at 300°F (150°C) for 8–10 minutes.
Microwave: Warm on medium power for 20–30 seconds (wrapped in a damp paper towel for moisture).
Frequently Asked Questions
- Can I make these ahead of time?
Yes! Shape the dough, freeze the scones on a tray, then store in a bag. Bake from frozen, adding 2–3 minutes to the bake time. - What can I use instead of buttermilk?
Use ¾ cup milk + 2 tsp lemon juice or vinegar. Let sit for 5 minutes before using. - Can I make them vegan?
Use plant-based butter and a dairy-free buttermilk (like almond milk + vinegar). - How do I know when they’re done?
They should be golden on top, and a toothpick inserted should come out clean. - Can I double the recipe?
Absolutely! Just make sure not to overcrowd your baking tray.
Final Thoughts
These Buttermilk Scones are warm, fluffy, and packed with buttery goodness. Whether you enjoy them plain, sweet, or savory, they’re a timeless treat that delivers every time. With just a few ingredients and simple steps, you can create a bakery-style delight right in your kitchen.
Try them out this weekend, and let me know how they turn out! Don’t forget to leave a review and share your creations—there’s nothing better than fresh-baked love from your oven.
Preparation Time: 10 minutes
Cooking Time: 15 minutes
Cuisine: British
Nutritional Information (Per Serving):
Calories: 260 | Protein: 4g | Carbohydrates: 30g | Fat: 13g | Fiber: 1g | Sodium: 280mg

Buttermilk Scones
- Total Time: 25 minutes
Description
Fluffy, golden, and slightly tangy, these Buttermilk Scones are the ultimate baked treat for breakfast, brunch, or afternoon tea. Made with simple pantry ingredients and rich buttermilk, they’re tender on the inside with a beautifully crisp top. Serve them warm with butter, jam, or clotted cream for a comforting classic you’ll want to make again and again.
Want recipes like this delivered straight to your inbox? Subscribe now to get the latest culinary creations you’ll love.
Ingredients
Dry Ingredients:
2 cups all-purpose flour
1 tbsp baking powder
¼ tsp baking soda
½ tsp salt
3 tbsp granulated sugar
Wet Ingredients:
½ cup unsalted butter (cold and cubed)
¾ cup buttermilk (cold, shaken well)
1 tsp vanilla extract (optional, for added depth)
Optional Add-ins:
½ cup dried fruit (like cranberries, currants, or raisins)
Zest of 1 lemon or orange (for a citrusy note)
Topping:
1 tbsp milk or extra buttermilk (for brushing)
1 tbsp coarse sugar (for sprinkling, optional)
Instructions
Step 1: Preheat & Prep
Preheat your oven to 425°F (220°C).
Line a baking sheet with parchment paper and set aside.
Step 2: Mix Dry Ingredients
In a large mixing bowl, whisk together flour, baking powder, baking soda, salt, and sugar.
This ensures even distribution of leavening agents and flavor.
Step 3: Cut in the Butter
Add cold cubed butter to the flour mixture.
Use a pastry cutter or fork to blend until the mixture resembles coarse crumbs with pea-sized butter pieces.
Cold butter is key to flaky layers.
Step 4: Add Buttermilk
Pour in the buttermilk and vanilla extract (if using).
Gently stir with a wooden spoon or spatula until a rough dough forms.
Do not overmix — the dough should be shaggy.
Step 5: Fold in Add-ins (Optional)
If using dried fruit or zest, fold it into the dough now.
Step 6: Shape the Dough
Turn the dough onto a lightly floured surface.
Gently knead 2-3 times until it comes together.
Pat it into a 1-inch thick round.
Cut into 8 wedges or use a biscuit cutter for rounds.
Place scones on the prepared baking sheet.
Step 7: Brush & Sprinkle
Brush the tops with milk or buttermilk.
Sprinkle with coarse sugar for a golden, slightly crunchy top.
Step 8: Bake the Scones
Bake for 12–15 minutes, or until golden brown and puffed.
Edges should be crisp, and the inside should be tender.
Step 9: Cool Slightly & Serve
Let scones cool on a wire rack for 5 minutes.
Serve warm with butter, jam, or your favorite spread.
Notes
Use Cold Butter – It creates steam pockets that make scones flaky.
Don’t Overmix – A gentle touch keeps them tender.
Chill Before Baking – If your dough gets too warm, chill it for 10 minutes.
Customize Freely – Add cheese, herbs, chocolate chips, or fruit for endless flavor combos.
Store Right – Keep leftovers in an airtight container for up to 2 days.
- Prep Time: 10 minutes
- Cook Time: 15 minutes
- Cuisine: British