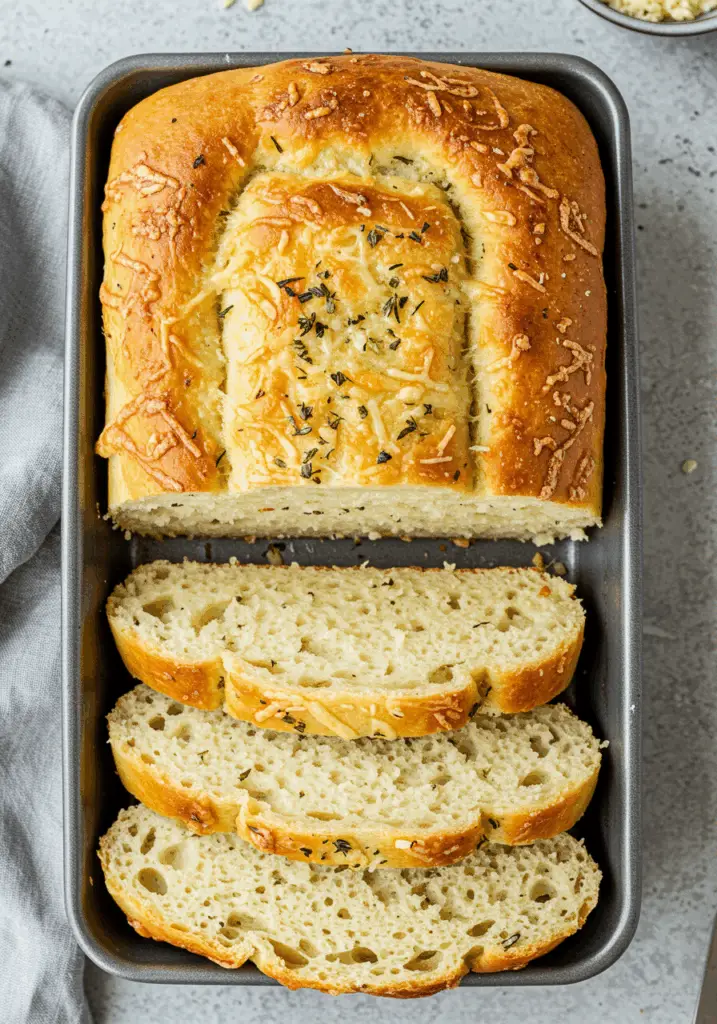
Crusty on the outside, soft and chewy on the inside—this Rustic No Knead Rosemary Garlic Bread is an artisan-style loaf you can make with minimal effort and big flavor. Infused with fresh rosemary and roasted garlic, this bread is perfect for dipping in soups, serving with pasta, or enjoying with just a swipe of butter.
Want recipes like this delivered straight to your inbox? Subscribe now to get the latest culinary creations you’ll love.
Why You’ll Love This Recipe
No Kneading Needed – Just mix and let time do the work.
Bold Flavor – Fresh rosemary and garlic make each bite irresistible.
Crusty Artisan Texture – Just like a bakery loaf, but homemade.
Minimal Ingredients – Simple pantry staples with huge payoff.
Versatile – Serve it with dinner, toast it, or turn it into sandwiches.
Ingredients You’ll Need
For the Bread:
- 3 cups all-purpose flour
- 1 ½ tsp salt
- ½ tsp instant yeast
- 1 ½ cups warm water (about 110°F)
- 1 tbsp fresh rosemary, chopped
- 4 cloves garlic, roasted and mashed
For Roasting the Garlic:
- 1 small head of garlic
- 1 tsp olive oil
- Pinch of salt
Tools You’ll Need
Mixing bowl
Dutch oven or heavy lidded pot
Parchment paper
Spoon or spatula
Sharp knife
Step-by-Step Instructions
Step 1: Roast the Garlic
Preheat oven to 400°F (200°C).
Slice the top off a head of garlic to expose the cloves.
Drizzle with olive oil and sprinkle with salt. Wrap in foil.
Roast for 30–35 minutes, until soft and golden. Cool, then squeeze out the cloves and mash into a paste.
Step 2: Mix the Dough
In a large bowl, stir together flour, salt, and yeast.
Add warm water, rosemary, and the roasted garlic paste.
Mix with a spoon until a shaggy, sticky dough forms.
Cover with plastic wrap or a towel and let rise at room temperature for 12–18 hours.
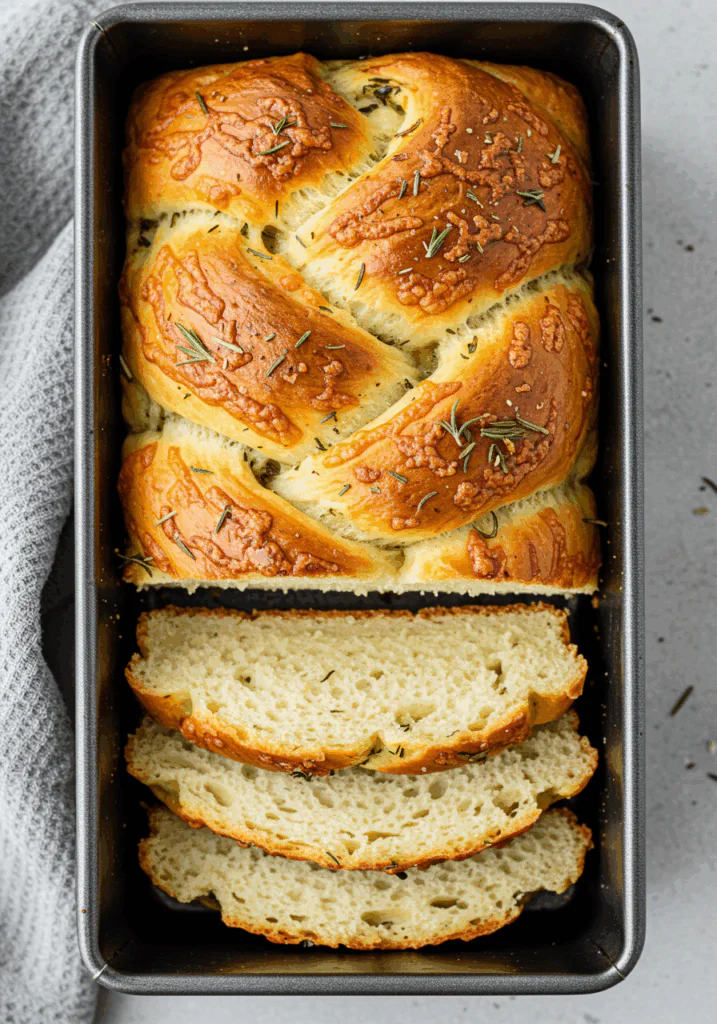
Step 3: Shape the Dough
After rising, dough should be bubbly and doubled in size.
Flour a surface and turn the dough out gently.
Shape into a round loaf (don’t knead—just fold over a few times).
Place onto a piece of parchment paper and let rest for 30–45 minutes.
Step 4: Preheat the Oven & Pot
While dough is resting, place a Dutch oven (with lid) in the oven and preheat to 450°F (230°C) for at least 30 minutes.
Step 5: Bake the Bread
Carefully remove the hot pot from the oven.
Lift the dough with the parchment and place into the pot.
Cover and bake for 30 minutes.
Uncover and bake an additional 10–15 minutes, until the crust is deep golden brown.
Step 6: Cool and Serve
Remove the bread and cool on a wire rack for at least 30 minutes before slicing.
Enjoy warm with butter, olive oil, or your favorite spread.
Tips for the Best No Knead Bread
Use a Dutch Oven – Creates the steamy environment needed for a crisp crust.
Don’t Rush the Rise – The long ferment builds flavor and texture.
Roast Garlic Ahead – Make extra and freeze for future loaves.
Try Bread Flour – For an even chewier crumb (optional).
Add Extras – Kalamata olives, sun-dried tomatoes, or grated cheese are great add-ins.
Serving Suggestions
With Soup – Ideal for dipping into tomato, lentil, or butternut squash soup.
For Breakfast – Toast with butter, jam, or avocado.
As a Side – Serve with pasta, roast chicken, or salad.
For Sandwiches – Use thick slices for grilled cheese or paninis.
With a Cheese Board – Rustic and flavorful for charcuterie pairings.
How to Store & Reheat
Storing:
Room Temp: Wrap in a towel or paper bag for 2–3 days.
Refrigerate: Not recommended—can dry out the bread.
Freeze: Wrap tightly in plastic and freeze for up to 2 months. Slice before freezing for convenience.
Reheating:
Oven: Warm slices at 350°F for 5–10 minutes.
Toaster: Great for reheating and crisping slices.
Frequently Asked Questions
1. Can I use dried rosemary?
Yes—use 1 tsp dried rosemary if you don’t have fresh.
2. What if I don’t have a Dutch oven?
Use any oven-safe pot with a lid or a baking dish covered with foil.
3. Is the dough supposed to be sticky?
Yes—it’s wetter than traditional dough, which helps develop an open crumb and chewy texture.
4. Can I add more garlic?
Absolutely! Add to taste depending on how bold you want the flavor.
5. Can I make it in one day?
Use more yeast (1 tsp) and let rise for 3–4 hours instead of overnight, though flavor won’t be as developed.
Final Thoughts
Rustic No Knead Rosemary Garlic Bread is the perfect blend of simplicity and flavor. With its fragrant herbs, roasted garlic, and crusty exterior, it’s a loaf you’ll want to make again and again. Whether you’re new to bread baking or a seasoned pro, this easy recipe delivers bakery-quality results with hardly any effort.
Bake it, break it, and enjoy every bite—no kneading required!
Preparation Time: 10 minutes (plus rising time)
Cooking Time: 45 minutes
Cuisine: Artisan / Rustic Baking
Nutritional Information (Per Slice, 1 of 12):
Calories: 160 | Protein: 4g | Carbohydrates: 30g | Fat: 2g | Fiber: 1g | Sodium: 280mg
Rustic No Knead Rosemary Garlic Bread
- Total Time: 55 minutes
Description
Crusty on the outside, soft and chewy on the inside—this Rustic No Knead Rosemary Garlic Bread is an artisan-style loaf you can make with minimal effort and big flavor. Infused with fresh rosemary and roasted garlic, this bread is perfect for dipping in soups, serving with pasta, or enjoying with just a swipe of butter.
Want recipes like this delivered straight to your inbox? Subscribe now to get the latest culinary creations you’ll love.
Ingredients
For the Bread:
-
3 cups all-purpose flour
-
1 ½ tsp salt
-
½ tsp instant yeast
-
1 ½ cups warm water (about 110°F)
-
1 tbsp fresh rosemary, chopped
-
4 cloves garlic, roasted and mashed
For Roasting the Garlic:
-
1 small head of garlic
-
1 tsp olive oil
-
Pinch of salt
Instructions
Step 1: Roast the Garlic
Preheat oven to 400°F (200°C).
Slice the top off a head of garlic to expose the cloves.
Drizzle with olive oil and sprinkle with salt. Wrap in foil.
Roast for 30–35 minutes, until soft and golden. Cool, then squeeze out the cloves and mash into a paste.
Step 2: Mix the Dough
In a large bowl, stir together flour, salt, and yeast.
Add warm water, rosemary, and the roasted garlic paste.
Mix with a spoon until a shaggy, sticky dough forms.
Cover with plastic wrap or a towel and let rise at room temperature for 12–18 hours.
Step 3: Shape the Dough
After rising, dough should be bubbly and doubled in size.
Flour a surface and turn the dough out gently.
Shape into a round loaf (don’t knead—just fold over a few times).
Place onto a piece of parchment paper and let rest for 30–45 minutes.
Step 4: Preheat the Oven & Pot
While dough is resting, place a Dutch oven (with lid) in the oven and preheat to 450°F (230°C) for at least 30 minutes.
Step 5: Bake the Bread
Carefully remove the hot pot from the oven.
Lift the dough with the parchment and place into the pot.
Cover and bake for 30 minutes.
Uncover and bake an additional 10–15 minutes, until the crust is deep golden brown.
Step 6: Cool and Serve
Remove the bread and cool on a wire rack for at least 30 minutes before slicing.
Enjoy warm with butter, olive oil, or your favorite spread.
Notes
Use a Dutch Oven – Creates the steamy environment needed for a crisp crust.
Don’t Rush the Rise – The long ferment builds flavor and texture.
Roast Garlic Ahead – Make extra and freeze for future loaves.
Try Bread Flour – For an even chewier crumb (optional).
Add Extras – Kalamata olives, sun-dried tomatoes, or grated cheese are great add-ins.
- Prep Time: 10 minutes (plus rising time)
- Cook Time: 45 minutes
- Cuisine: Artisan / Rustic Baking