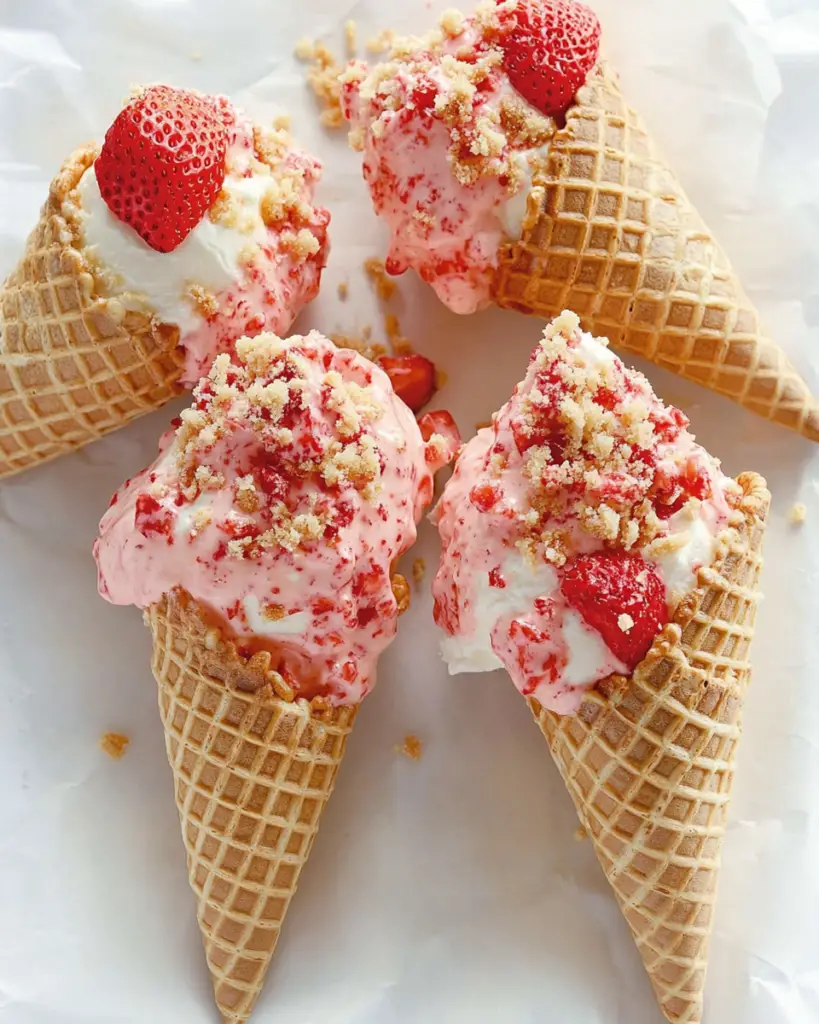
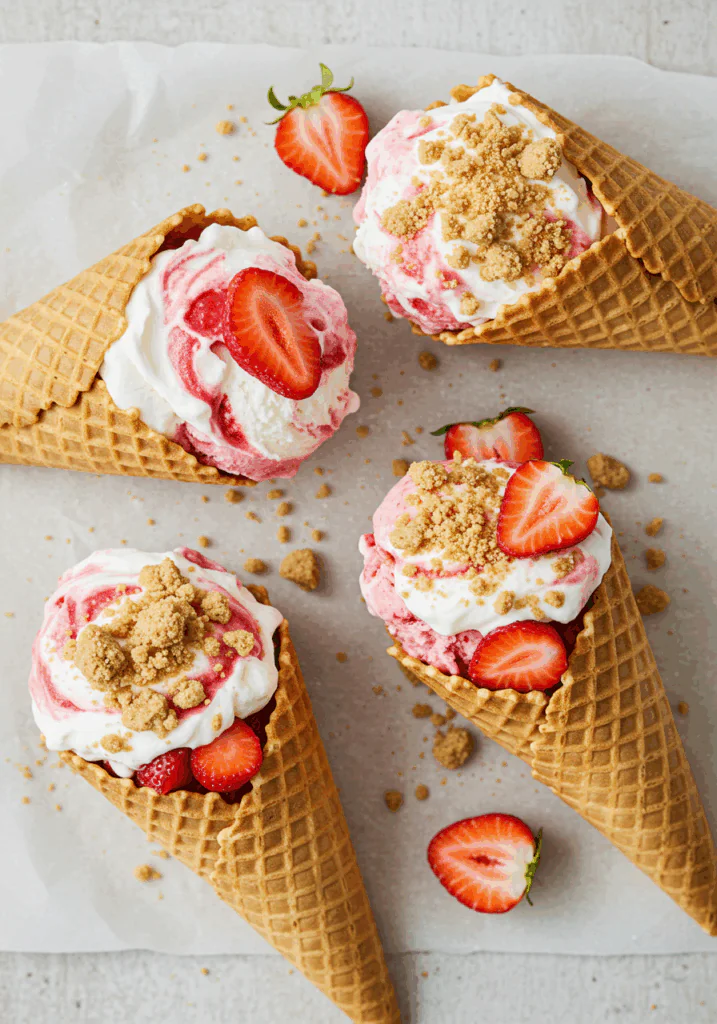
Strawberry Crunch Cheesecake Cones
These Strawberry Crunch Cheesecake Cones are the perfect combination of creamy cheesecake filling and a sweet, crunchy topping—all served in a fun waffle cone! Ideal for summer parties, picnics, or any time you need a sweet treat, these individual desserts are as delightful to make as they are to eat. The strawberry crunch topping adds a delicious texture that pairs perfectly with the smooth cheesecake filling, making each bite a little bit of heaven.
Subscribe to our newsletter for more fun and easy dessert ideas sent straight to your inbox!
Why You’ll Love These Strawberry Crunch Cheesecake Cones
✔ Fun & Unique – A handheld version of classic cheesecake, perfect for parties.
✔ Sweet & Crunchy – The strawberry crunch topping adds a delightful texture to the creamy cheesecake filling.
✔ No-Bake – No oven required! These cones are a breeze to make.
✔ Customizable – You can mix up the flavors with different fruits and toppings.
Ingredients for Strawberry Crunch Cheesecake Cones
For the cheesecake filling:
- 8 oz cream cheese (softened)
- 1 cup heavy cream
- ½ cup powdered sugar
- 1 teaspoon vanilla extract
- 2 tablespoons lemon juice
For the strawberry crunch topping:
- 1 cup freeze-dried strawberries (crushed)
- 1 cup graham cracker crumbs
- 3 tablespoons unsalted butter (melted)
For the cones:
- 6 waffle cones
- Fresh strawberries (optional, for garnish)
Tools You’ll Need
✔ Mixing bowl
✔ Hand mixer or stand mixer
✔ Spoon or piping bag for filling
✔ Food processor or bag for crushing the freeze-dried strawberries
✔ Small bowl for melting butter
How to Make Strawberry Crunch Cheesecake Cones
Step 1: Make the Cheesecake Filling
- In a mixing bowl, beat the cream cheese until smooth using a hand mixer or a stand mixer.
- Add the heavy cream, powdered sugar, vanilla extract, and lemon juice, and beat until thick and creamy. Set aside.
Step 2: Prepare the Strawberry Crunch Topping
- Place the freeze-dried strawberries in a food processor and pulse until finely crushed. If you don’t have a food processor, place the strawberries in a zip-top bag and crush them with a rolling pin.
- In a separate bowl, combine the crushed strawberries, graham cracker crumbs, and melted butter. Stir until the mixture is evenly combined and crumbly.
Step 3: Assemble the Cones
- Take each waffle cone and spoon or pipe the cheesecake filling into the cone, filling it about 2/3 of the way up.
- Generously top the cheesecake filling with the strawberry crunch topping, pressing down slightly to ensure it sticks.
Step 4: Garnish & Serve
- If desired, garnish with a fresh strawberry on top of the crunch.
- Serve immediately or refrigerate for up to 2 hours before serving for a chilled treat.
Serving Suggestions
- Serve these cones at a summer barbecue, birthday party, or picnic.
- Pair with a refreshing lemonade or a chilled fruit spritzer for a light, summery beverage.
- For extra fun, use colorful waffle cones or try other fruit crunch toppings, like blueberries or mangoes.
Tips for the Best Strawberry Crunch Cheesecake Cones
✔ Make ahead – You can prepare the cheesecake filling and strawberry crunch topping in advance, then assemble the cones right before serving.
✔ Use fresh fruit – Garnish with fresh strawberries or even other berries like raspberries or blackberries for variety.
✔ Don’t overfill – Leave a little room at the top of the cone for the crunch topping to sit nicely.
✔ Use mini cones – For smaller, bite-sized servings, try using mini waffle cones instead.
Storage Instructions
- Refrigerate any leftover cheesecake cones in an airtight container for up to 2 days.
- Freeze the filling and topping separately if you want to store them for longer. Let the cones sit at room temperature for a few minutes before serving if frozen.
Frequently Asked Questions (FAQ)
Q1: Can I make these with regular strawberries instead of freeze-dried?
A: Fresh strawberries will work as a garnish, but the crunch topping requires freeze-dried strawberries for that unique texture.
Q2: Can I make this recipe gluten-free?
A: Yes! Use gluten-free graham cracker crumbs to make the topping gluten-free.
Q3: Can I use other fruits in the crunch topping?
A: Absolutely! You can swap the strawberries for freeze-dried blueberries, raspberries, or even tropical fruits like pineapple or mango for a fun twist.
Conclusion: A Sweet and Fun Treat!
These Strawberry Crunch Cheesecake Cones are a fun and easy dessert that everyone will love. The creamy cheesecake filling paired with the crunchy strawberry topping makes for a perfect balance of sweet and tangy flavors. Serve them at your next gathering or enjoy them as a special treat for yourself!
Did you make this recipe? Share your photos and tag us on social media!
🕒 Preparation Time: 15 minutes
🌍 Cuisine: American (Dessert)
Nutritional Information (per serving)
Calories: 250
Protein: 3g
Carbohydrates: 28g
Fat: 17g
Fiber: 2g
Enjoy every crunchy, creamy bite of this delicious treat!
Print
Strawberry Crunch Cheesecake Cones
- Total Time: 15 minutes
Description
These Strawberry Crunch Cheesecake Cones are the perfect combination of creamy cheesecake filling and a sweet, crunchy topping—all served in a fun waffle cone! Ideal for summer parties, picnics, or any time you need a sweet treat, these individual desserts are as delightful to make as they are to eat. The strawberry crunch topping adds a delicious texture that pairs perfectly with the smooth cheesecake filling, making each bite a little bit of heaven.
Subscribe to our newsletter for more fun and easy dessert ideas sent straight to your inbox!
Ingredients
For the cheesecake filling:
- 8 oz cream cheese (softened)
- 1 cup heavy cream
- ½ cup powdered sugar
- 1 teaspoon vanilla extract
- 2 tablespoons lemon juice
For the strawberry crunch topping:
- 1 cup freeze-dried strawberries (crushed)
- 1 cup graham cracker crumbs
- 3 tablespoons unsalted butter (melted)
For the cones:
- 6 waffle cones
- Fresh strawberries (optional, for garnish)
Instructions
Step 1: Make the Cheesecake Filling
- In a mixing bowl, beat the cream cheese until smooth using a hand mixer or a stand mixer.
- Add the heavy cream, powdered sugar, vanilla extract, and lemon juice, and beat until thick and creamy. Set aside.
Step 2: Prepare the Strawberry Crunch Topping
- Place the freeze-dried strawberries in a food processor and pulse until finely crushed. If you don’t have a food processor, place the strawberries in a zip-top bag and crush them with a rolling pin.
- In a separate bowl, combine the crushed strawberries, graham cracker crumbs, and melted butter. Stir until the mixture is evenly combined and crumbly.
Step 3: Assemble the Cones
- Take each waffle cone and spoon or pipe the cheesecake filling into the cone, filling it about 2/3 of the way up.
- Generously top the cheesecake filling with the strawberry crunch topping, pressing down slightly to ensure it sticks.
Step 4: Garnish & Serve
- If desired, garnish with a fresh strawberry on top of the crunch.
- Serve immediately or refrigerate for up to 2 hours before serving for a chilled treat.
Notes
✔ Make ahead – You can prepare the cheesecake filling and strawberry crunch topping in advance, then assemble the cones right before serving.
✔ Use fresh fruit – Garnish with fresh strawberries or even other berries like raspberries or blackberries for variety.
✔ Don’t overfill – Leave a little room at the top of the cone for the crunch topping to sit nicely.
✔ Use mini cones – For smaller, bite-sized servings, try using mini waffle cones instead.
- Prep Time: 15 minutes
- Cuisine: American (Dessert)